One of the many great things about Gunpla is that the more you obsess over the details, the more amazing your kit becomes. For beginners looking to take theirs to the next level, the easiest way to improve the look of your kit is with panel lining. And the great thing about panel lining is that once you know how to do it, you can easily apply it to anything you build!
What Is Gunpla Panel Lining?
Panel lining is the process of applying ink or paint to each piece’s grooves to improve the overall look and detail of your Gunpla kit. Once mastered, this simple process can be applied to any kit you’re working on, which means it’s an essential skill for any Gunpla enthusiast. What’s great about panel lining is that it’s a great way for beginners to improve the overall look of their kits without the need for painting skills. If you don’t want to hand paint or spray paint your Gunpla but still want your kit to have more details, then panel lining is the way to go! It’s very simple and requires minimal tools—just a panel lining marker and a rubber pencil eraser.
Gundam Markers
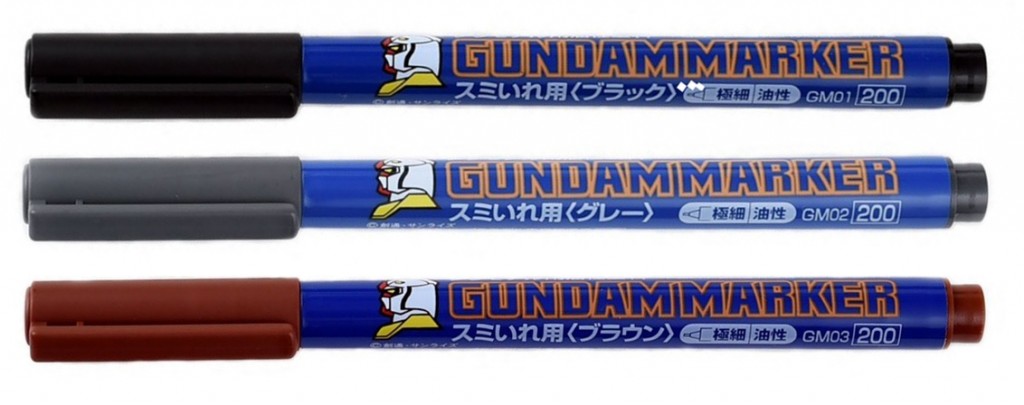
What kind of marker should you use? The most common are the Gundam Panel Lining Markers, which are readily available at hobby shops. The most popular Gundam Marker is the GM01, which is a basic fine black marker; also used quite frequently are the GM02 (grey) and GM03 (brown) colors. If you haven’t shopped around for these markers yet, you will come across a variety of tips, with some designed for panel lining and others for painting. The fine tip markers are made specifically for panel lining. The Gundam Markers can be erased by rubbing a rubber eraser on any mistakes or excess ink, but make sure you do so right away after applying the panel lining, as Gundam Markers become harder to erase once the ink has dried.
Note: Due to international shipping restrictions, FROM JAPAN may not be able to ship shipments of Gundam Markers overseas.
Black Gundam Marker GM01
The Black Gundam Marker is best for light colored pieces like the white armour of a Unicorn Gundam or the red armour of a Zaku Mobile Suit. If you want an anime look for your Gunpla kit, the black Gundam Marker is your best choice.
Gray Gundam Marker GM02
If you want a more realistic looking kit, then you can use the Gray Gundam Marker. It is also a good choice for light colored Gunpla pieces.
Brown Gundam Marker GM03
The brown Gundam Marker is best for simulating rust in some of your panel lines. It also goes well with red and yellow armour parts.
COPIC Multi-Liners
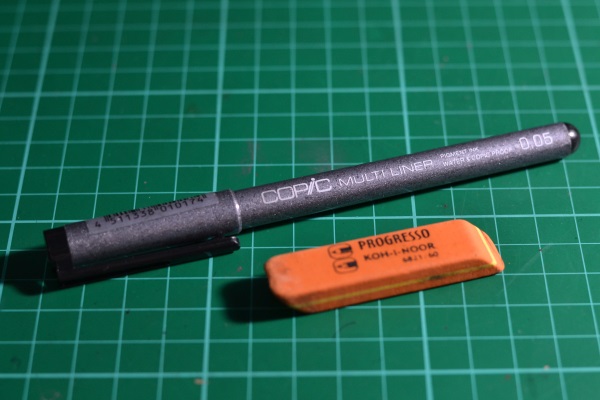
There are also alternative markers if you don’t prefer to use the Gundam Markers. The COPIC Multi-Liner is preferred by some builders as they are easier to erase if you make mistakes or have applied excess panel lining. The COPIC Multi-Liner takes a longer time to dry and cure hence making it easier to fix mistakes. But the downside is that you need to be careful in handling the parts that have already been panel lined, since you risk smudging the still wet ink. For the COPIC Multi-Liner any rubber pencil eraser can be used; and since the plastic surface is smooth, wet ink can be easily removed by rubbing the pencil eraser along the pieces panel lining. Another alternative worth mentioning are Micron Markers, which come in many different colors and tip sizes.
How to Use a Gundam Marker
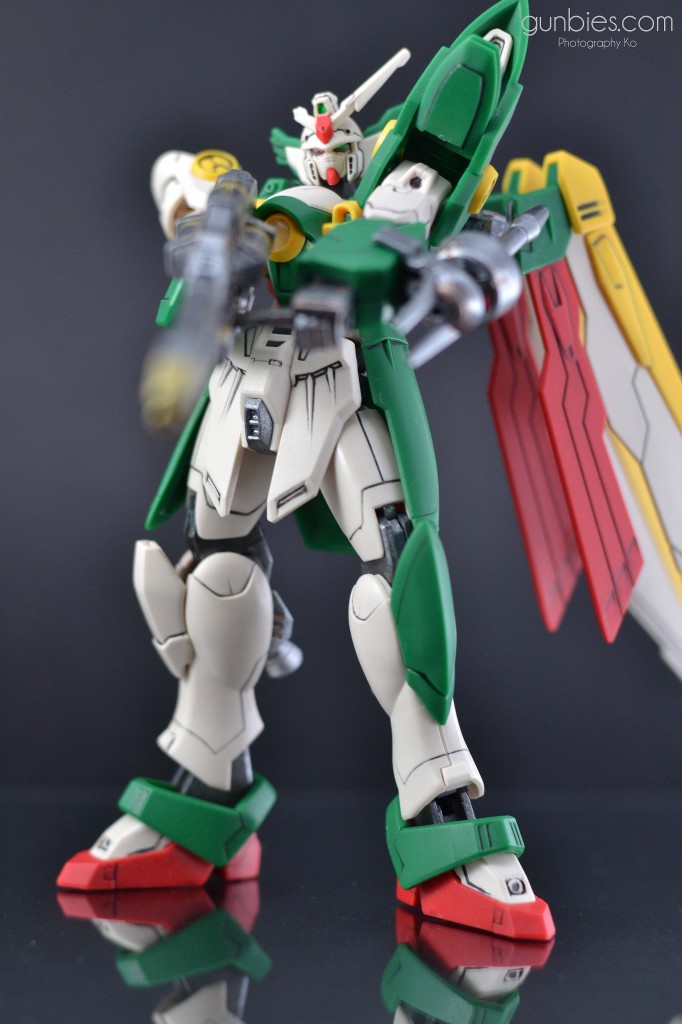
To demonstrate how to properly add panel lining to your Gundam kit pieces, let’s use the wing piece below as an example. Remember, this method can be applied to any panel lining you do. 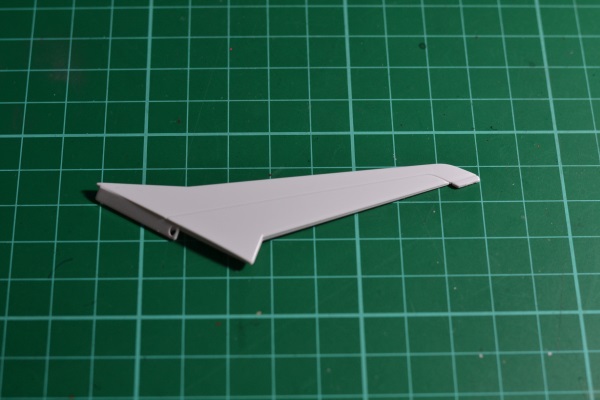 Applying panel lining using markers is actually pretty easy. Just run the marker through on the panel line, making sure the ink seeps through the groove. Then, use a rubber eraser to rub off any excess ink or mistakes. Let it dry overnight.
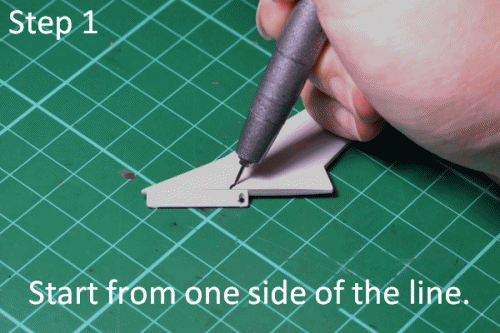
Tip: Rub the eraser perpendicular to the panel line to prevent smudging the ink along the panel line.
Thick vs. Thin Panel Lines
Some people prefer the lines to be thick, you can forego the rubber eraser if you want your final lines to be thick. You just need a steady hand to make a nice panel line. 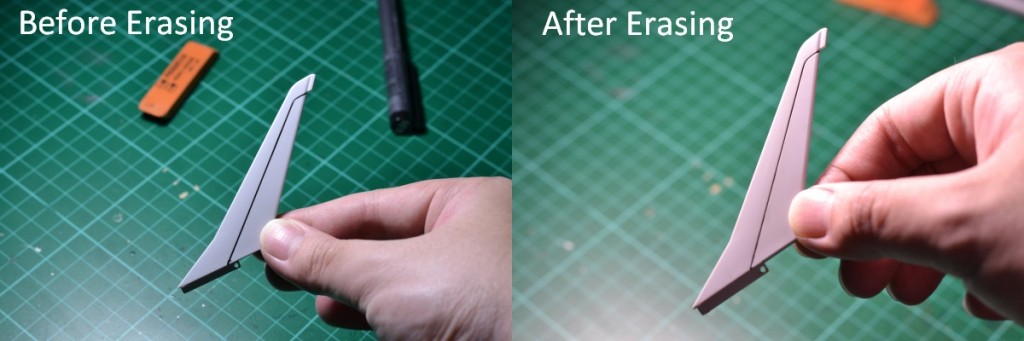
Panel Lining Before or After Painting?
If you painted your kit beforehand, make sure that you have sprayed some clear gloss on your Gunpla kit or parts before applying the panel lining. Panel lining works best on smooth surfaces like the bare plastic parts or pre-painted parts that have been protected with clear gloss paint. You can still do panel lining on a clear matte sprayed part, but it might be impossible to correct any mistakes since the panel line ink will really stick on a matte surface because of the rough surface.
Choosing the Right Size Gundam Marker Tip
HG and RG kits usually have smaller panel lines, so choose a smaller tip marker like .01 or .005 if you can find one. For MG kits, they obviously have bigger width panel lines, which you can use bigger tip markers such as .05 and above.
Caring For Your Gundam Markers
Be careful not to put too much pressure on the Gundam Marker tip as it can be damaged. If you look closely at your marker tip, it’s actually like a small soft sponge. Damaged or frayed tips do not give a nice clean line. It is better to choose the appropriate tip size for the right kind of panel line.
Advanced Gundam Panel Lining: The Gunpla Marker Alternative
There are other methods for applying panel lining and one of them is the “panel wash” method. The idea is to use a heavily diluted paint (usually black) and just let physics do the job by having the ink travel through the panel groove by itself like magic.
Pros & Cons of “Panel Wash” Lining
The advantage is that panel lining will be faster and easier since it will be semi-automatic. You just have to remove the excess paint blobs after drying. Also, using this method can yield finer and cleaner panel lines on your Gunpla kit. The disadvantage in using the “panel wash” method is the risk of applying too much panel line enamel paint as your plastic parts might become brittle after the enamel paint has dried. This is because enamel paint corrodes the plastic material that Gunpla parts are made of when too much is applied, so make sure that you dab the brush of the panel line accent color on some paper or on the rims of the bottle to remove excess paint.
“Panel Wash” Lining Materials
The easiest way to do this is use a pre-diluted enamel based paint which are the Tamiya Panel Line Accent Color. Take note that this is enamel based paint, so you will be needing some Tamiya X-20 enamel paint thinner to remove excess ink after the panel lines have dried and cured.  The minimum materials in order to execute this panel lining method are:
- Panel Line Accent Color
- Enamel paint thinner
- Cotton swabs for the removal of excess paint later on
The Panel Line Accent Color also comes in gray and brown much like the Gundam Markers.
Note: Due to international shipping restrictions, FROM JAPAN cannot complete overseas shipments of paints or enamel paint thinner.
Important Note: Always work in a well ventilated environment and have a fire extinguisher around your room for safety when painting your Gunpla!
“Panel Wash” Lining Tutorial
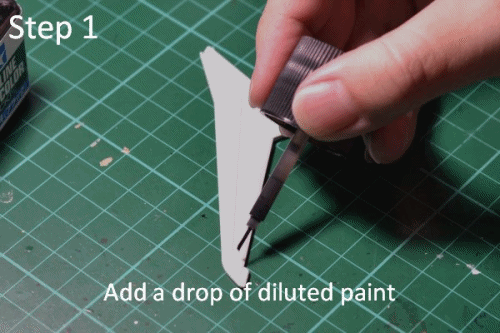 Once you have diluted the paint, gently touch points along the panel line. This will naturally disperse the paint along the groove. After the lining is applied, wait 5–10 minutes for drying, and then using a cotton swab dipped in paint thinner carefully rub away the excess paint on the panel. It’s best to rub the swab in a perpendicular direction to the line to avoid erasing the lining. Here is a short YouTube video by CarDoorHKG for an additional reference on how the panel line accent color interacts with the panel line:
Important Tip: Don’t use this method if you painted your parts with acrylic paint since enamel paint can dissolve the underlying acrylic paint. You can only use this method on bare plastic parts, or painted parts that have protected with LACQUER based clear gloss coat, since enamel cannot dissolve lacquer paint.
Panel Lining Can Take Your Gunpla to the Next Level
And there you have it! Panel lining is easy to do and can make your Gunpla kit extra detailed with less effort, especially if you’re a busy person. For more guides on making kickass Gunpla, check out our Gunpla Series:
- How to Choose the Right Gundam Model Kit
- The Gunpla Kit Painting Guide for Realistic Models
- The Gunpla Tutorial: How to Decal your Gundam Plastic Model
- The Gunpla Top Coat Guide: Giving your Gunpla a Fantastic Finish
- The Gunpla Weathering Guide: Creating Realistic Battle Damage


